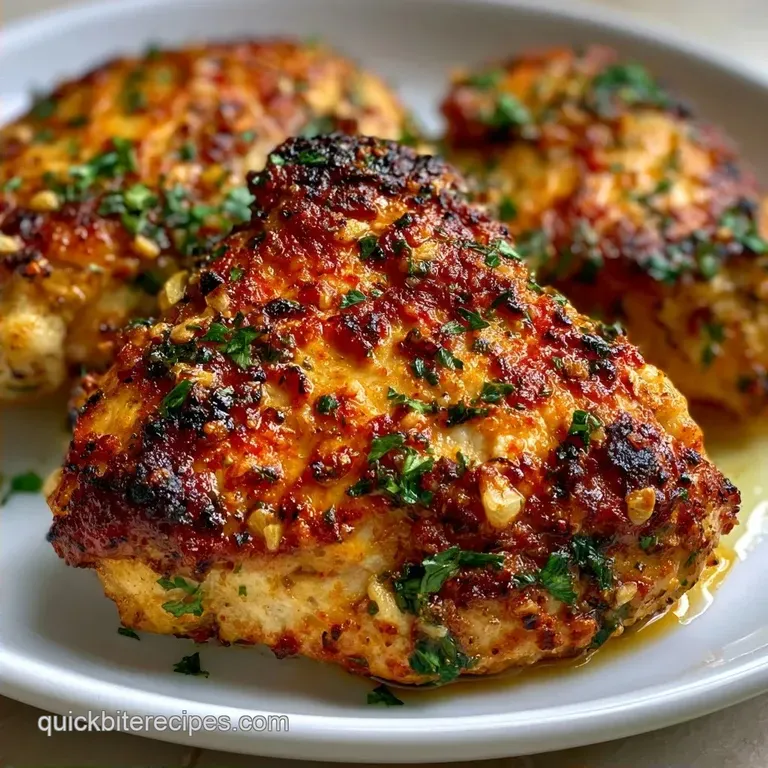
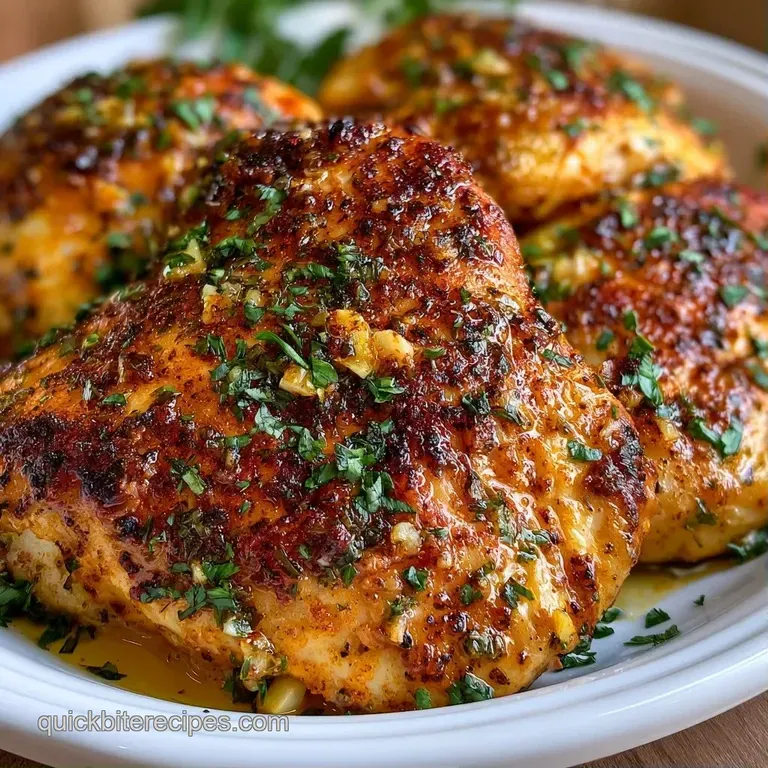
Star Chicken Thighs with Garlic: Crispy and Rich
- Time: 10 min active + 25 min cooking = Total 35 mins
- Flavor/Texture Hook: Shattering crispy skin with a rich, garlic infused butter glaze
- Perfect for: Weeknight dinners that feel like a bistro meal, beginner friendly
- Star Chicken Thighs with Garlic
- Why This Technique Works
- Component Analysis
- The Full Shopping List
- Gear You'll Need
- Step-By-Step Cooking Flow
- Fixing Common Cooking Errors
- Troubleshooting Common Issues
- Flavor Tweaks and Swaps
- Keeping Your Chicken Fresh
- Best Sides for Thighs
- Adjusting the Batch Size
- Recipe FAQs
- 📝 Recipe Card
Star Chicken Thighs with Garlic
That first sound is what gets me, the aggressive sizzle when the skin hits the shimmering oil. It's a sound that means dinner is actually going to be good. Discover the ultimate recipe for Star Chicken Thighs with Garlic and Butter.
There is something about the smell of garlic hitting hot butter that just fills a house and makes everyone wander into the kitchen asking "what is that?"
Growing up, garlic butter chicken was the "special occasion" meal that didn't actually require a special occasion. It's a style of cooking that feels very European, like something you'd find in a tiny French bistro, but it's become a staple in American home kitchens because it's just so reliable.
It's the kind of comfort food that feels fancy but is actually just about getting your heat and timing right.
You can expect a dish where the skin is thin and crisp, while the meat underneath stays tender and dripping with flavor. We're not doing a slow braise here, we're going for high impact and fast results.
Trust me on this, once you see how the butter glaze coats the chicken in the oven, you'll never go back to plain baked thighs.
Why This Technique Works
Over High heat Rendering: Searing skin side down first forces the fat to melt away, which is the only way to get that shatter effect instead of rubbery skin.
Layered Aromatics: By adding the garlic and herbs in a butter glaze after the initial sear, we prevent the garlic from burning in the high heat of the pan.
Ambient Oven Heat: Moving the cast iron skillet directly into the oven ensures the chicken cooks evenly from all sides without drying out the exterior.
Carryover Cooking: Pulling the meat at 165°F allows the internal temperature to stabilize, keeping the juices velvety rather than evaporated.
| Method | Time | Texture | Best For |
|---|---|---|---|
| Stovetop Only | 20 mins | Crispy skin, slightly drier meat | Quick lunches |
| Oven Only | 45 mins | Soft skin, very juicy meat | Meal prep |
| Sear & Bake | 35 mins | Shattering skin, velvety meat | Dinner parties |
Component Analysis
| Ingredient | Science Role | Pro Secret |
|---|---|---|
| Bone in Thighs | Moisture Reservoir | The bone conducts heat to the center, preventing overcooking |
| Unsalted Butter | Flavor Carrier | Melt it first to avoid splashing and ensure even coating |
| Fresh Garlic | Aromatic Base | Mince it finely so it distributes evenly in the glaze |
| Dried Oregano | Earthy Balance | Rub it between your palms to wake up the oils |
The Full Shopping List
Get your ingredients ready on the counter. It makes the whole process smoother when you're not hunting for the paprika while the pan is screaming hot.
- 2 lbs bone in, skin on chicken thighs Why this? Dark meat stays juicy at high oven temps
- 4 tbsp unsalted butter, melted Why this? Provides the rich, velvety base for the glaze
- 4 cloves fresh garlic, minced Why this? Fresh has more "bite" than the jarred stuff
- 1 tsp dried oregano Why this? Adds a classic herbal, savory note
- 1 tsp dried thyme Why this? Pairs perfectly with garlic and poultry
- 1/2 tsp paprika Why this? Mostly for that deep golden color
- 1 tsp kosher salt Why this? Coarse grains season more evenly
- 1/2 tsp cracked black pepper Why this? Freshly cracked adds a subtle heat
- 1 tbsp olive oil Why this? High smoke point for the initial sear
Substitution Table
| Original Ingredient | Substitute | Why It Works |
|---|---|---|
| Unsalted Butter | Ghee (4 tbsp) | Higher smoke point. Note: Slightly nuttier flavor |
| Bone in Thighs | Boneless Thighs | Faster cook time. Note: Less flavor, higher risk of drying |
| Fresh Garlic | Garlic Powder (1 tsp) | Similar flavor. Note: Lacks the punch of fresh aromatics |
| Dried Oregano | Dried Basil | Similar herbal profile. Note: Sweeter, less pungent |
If you're looking for a different way to use your poultry, you might enjoy my Best Chicken Thigh Dinner which uses a slightly different flavor profile.
Gear You'll Need
You don't need a professional kitchen for this, but one piece of gear is non negotiable: a 12 inch cast iron skillet. I use a Lodge skillet because it holds heat like a beast. If you use a non stick pan, you'll lose a lot of that crust because they can't handle the high heat needed for the sear.
You'll also want some heavy duty paper towels to dry the chicken, a small bowl for whisking the glaze, and an instant read meat thermometer. Honestly, don't even bother guessing the doneness. A thermometer is the only way to ensure the meat is safe and juicy.
Step-by-step Cooking Flow
Let's crack on. This is all about the flow, so keep your oven preheating while you handle the prep.
- Pat the chicken thighs completely dry with paper towels and season both sides generously with kosher salt and cracked black pepper. Note: Moisture is the enemy of crispiness
- Heat olive oil in a 12 inch cast iron skillet over medium high heat until shimmering.
- Place chicken skin side down, press firmly for 30 seconds, and sear without moving for 6–8 minutes until the skin is golden brown and releases easily from the pan.
- Flip the thighs and sear the bottom for an additional 2 minutes.
- Whisk together melted butter, minced garlic, dried oregano, dried thyme, and paprika in a small bowl.
- Pour the garlic butter glaze directly over each chicken thigh in the skillet. Note: Use a spoon to ensure every inch is coated
- Transfer the skillet immediately into a preheated 400°F (200°C) oven and bake for 12–15 minutes until the internal temperature reaches 165°F (74°C).
- Remove from oven and let the meat rest in the pan for 5 minutes. Note: This lets the juices redistribute
Chef's Tip: To get an even more shattering crust, leave your chicken thighs uncovered in the fridge for 2 hours before cooking. This dries out the skin naturally.
Fixing Common Cooking Errors
When making Star Chicken Thighs with Garlic, the most common issues usually come down to temperature control. If the pan isn't hot enough, the chicken sticks. If it's too hot, the butter burns.
Troubleshooting Common Issues
| Issue | Solution |
|---|---|
| Why Your Garlic Burnt | Garlic has a very low burn point. If you put it in the pan at the start, it'll turn bitter and black before the chicken is even warm. |
| Why Your Skin Is Rubbery | This usually happens if the chicken was damp when it hit the oil or if you flipped it too early. You have to be patient. |
| Why the Center Is Raw | Since we're using bone in thighs, the area closest to the bone takes longest to cook. If the skin is dark but the inside is raw, just pop it back in for 5 more minutes. |
Common Mistakes Checklist
- ✓ Did you pat the skin bone dry?
- ✓ Did you resist the urge to move the chicken during the first 6 minutes?
- ✓ Is the oven actually preheated to 400°F?
- ✓ Did you let the meat rest before serving?
- ✓ Did you use a meat thermometer for the final check?
Flavor Tweaks and Swaps
If you want to change things up, this recipe is a great base. For a zesty refresh, squeeze half a lemon over the thighs right when they come out of the oven. The acid cuts through the richness of the butter.
For a sweet and savory kick, add 1 teaspoon of honey to the garlic butter glaze. This creates a slight caramelization in the oven that tastes incredible. If you need a dairy-free option, swap the butter for a high-quality vegan butter or coconut oil, though you'll lose some of that specific creamy flavor.
If you're feeling fancy, try adding a pinch of smoked paprika instead of regular paprika for a wood fired taste. This is a great way to make these thighs with garlic and butter feel more like a BBQ dish.
Keeping Your Chicken Fresh
When handling raw poultry, always remember the basics. I leave here a link from chicken and food poisoning. to keep you safe in the kitchen. Always wash your hands and surfaces after the raw meat has touched them.
In the Fridge
Store leftovers in an airtight container. According to USDA, cooked chicken can last up to 4 days if it’s stored properly. After that, even if you reheat it in the oven, the quality drops significantly.
In the Freezer
You can freeze these for up to 3 months. Let them cool completely before freezing to avoid ice crystals. I recommend freezing them in individual portions wrapped in foil and then placed in a freezer bag.
The Best Reheating Method
Avoid the microwave if you can, as it makes the skin soggy. Instead, put them in a 350°F (175°C) oven for about 10 minutes. This helps bring back some of that crispiness to the skin.
Best Sides for Thighs
Because these Star Chicken Thighs with Garlic are so rich, you need sides that can balance the fat. A simple arugula salad with a lemon vinaigrette is a classic choice.
If you want something heartier, I highly recommend serving these alongside some Kopytka with Mushroom Sauce. The pillowy potato dumplings and earthy mushrooms soak up the extra garlic butter from the pan beautifully.
Another great option is roasted asparagus or sautéed spinach. Just toss the veggies in the same pan after you remove the chicken to pick up all those brown bits (the fond) and the leftover butter. It's a zero waste way to get a second side dish with almost zero extra effort.
Adjusting the Batch Size
If you're cooking for just yourself, you can halve the recipe easily. Use a smaller skillet, like an 8 inch, to keep the heat concentrated. Reduce the oven time by about 20%, but always rely on that thermometer.
When scaling up for a crowd, don't try to cram 8 lbs of chicken into one pan. You'll crowd the skillet, the temperature will drop, and you'll end up steaming the meat instead of searing it. Work in batches. Sear 4 thighs at a time, move them to a baking sheet, and then bake them all together.
For the seasoning, don't just double everything. Salt and spices can become overwhelming. Use 1.5x the seasoning for a double batch and taste as you go. Keep the liquids similar, as too much butter in the pan can make the chicken boil rather than roast.
Recipe FAQs
How to get the skin extra crispy?
Pat the chicken thighs completely dry with paper towels before seasoning. Moisture creates steam in the pan, which prevents the skin from browning and crisping effectively.
Can I use boneless chicken thighs instead of bone-in?
Yes, but reduce the oven time. Boneless thighs cook much faster, so check the internal temperature after 8 10 minutes to prevent the meat from drying out.
Why is the garlic turning bitter and black in the pan?
You likely added the garlic too early. Because garlic has a low burn point, it must be whisked into the butter glaze and added right before the skillet enters the oven.
How to tell when the chicken is fully cooked?
Use a meat thermometer to reach 165°F (74°C). Insert the probe into the thickest part of the thigh, making sure not to touch the bone, for an accurate reading.
Is it true that I should flip the chicken every few minutes for better browning?
No, this is a common misconception. You must sear the skin side down without moving it for 6 8 minutes to ensure the skin becomes golden brown and releases easily from the pan.
What should I serve with these garlic chicken thighs?
Pair them with a fresh vegetable side. The rich garlic butter complements roasted asparagus perfectly for a balanced dinner.
Why is the chicken skin rubbery instead of crisp?
The meat was likely damp or flipped too soon. Ensure you use a paper towel to remove all surface moisture and be patient until the skin naturally releases from the cast iron.
Star Chicken Thighs With Garlic

