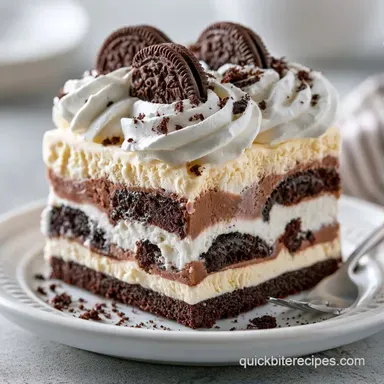
Quick Ice Cream Cake Recipe with Chocolate Chips

- Time: 20 min active + 4 hrs chilling
- Flavor/Texture Hook: Creamy layers with a crunch of chocolate chips
- Perfect for: Last minute birthday parties or summer cravings
- Quick Ice Cream Cake Recipe
- Why This Method Works
- The Ingredient Breakdown
- Essential Kitchen Tools
- Step By Step Process
- Pro Tips and Pitfalls
- Flavor Twists and Swaps
- Handling Common Issues
- Troubleshooting Common Issues
- Adjusting the Size
- Busted Dessert Myths
- Storage and Leftovers
- Final Presentation Tips
- Recipe FAQs
- 📝 Recipe Card
Quick Ice Cream Cake Recipe
The sound of a springform pan clicking open is basically the start of a party. For most of us, these cakes bring back memories of those giant, neon colored grocery store desserts. We loved them as kids, but let's be honest, the frosting often tasted like frozen sugar and wax.
I wanted that same nostalgic vibe but ingredients that actually taste like real food. I spent a few weekends figuring out how to stop the cake base from getting soggy under the weight of the ice cream. It turns out, the trick is all in the temperature of your base before the first scoop hits the pan.
This Quick Ice Cream Cake Recipe isn't about being a pastry chef. It's about using a few smart shortcuts to get a dessert on the table that looks like it took all day. We're talking about rich, cold layers and a topping that stays fluffy instead of turning into a block of ice.
Why This Method Works
- Cold Base Logic: Starting with a chilled cake layer prevents the ice cream from melting instantly upon contact. This keeps the lines between your layers clean.
- Fat Based Stability: Using heavy whipping cream with a touch of sugar creates a stable foam. According to Serious Eats, the fat globules in the cream trap air, which stops the topping from collapsing during the second freeze.
- Layered Freezing: Freezing the ice cream before adding the whipped cream prevents the topping from sinking. It gives the dessert a structural foundation.
| Approach | Effort | Texture | Best For |
|---|---|---|---|
| From Scratch | High | Dense/Rich | Anniversary Cakes |
| Shortcut Method | Low | Light/Creamy | Weeknight Treats |
| store-bought | Zero | Airy/Sweet | No Time Scenarios |
The Ingredient Breakdown
| Ingredient | What It Does | Best Swap |
|---|---|---|
| Cake Mix | Provides the sturdy base | Crushed graham crackers |
| Vanilla Ice Cream | Acts as the creamy neutral layer | Frozen yogurt |
| Chocolate Ice Cream | Adds depth and contrast | Strawberry or Mint chip |
| Heavy Cream | Creates the fluffy outer shell | Coconut cream (full fat) |
Essential Kitchen Tools
You don't need a professional kitchen for this. A 9 inch springform pan is the only "must have" because it lets you pop the cake out without destroying the sides. I also suggest a sturdy offset spatula for smoothing the ice cream. If you don't have one, a regular butter knife works fine, just keep it cold.
A hand mixer or a stand mixer such as KitchenAid will make the whipped cream phase much faster. Doing it by hand is possible, but your arm will feel it. Also, grab some parchment paper. Without it, the cake base likes to stick to the bottom of the pan, and you'll end up with a "naked" cake.
Step by step Process
Phase 1: Preparing the Foundation
- Line the bottom of your 9 inch springform pan with parchment paper. Note: This ensures the cake releases cleanly.
- Press your prepared cake mix layer firmly into the bottom of the pan. Press until the surface is flat and compact.
- Place the pan in the freezer for 10 minutes. Note: A cold base prevents the ice cream from melting.
Phase 2: Layering the Frozen Filling
- Scoop half of your vanilla ice cream into the pan. Spread it with a spatula until it's level and smooth.
- Sprinkle the chocolate chips or crushed Oreos over the vanilla. Note: Keep them in a thin, even layer so they don't clump.
- Add the chocolate or strawberry ice cream on top. Smooth it out until it reaches the edges of the pan.
- Freeze the whole thing for 2 hours. Note: This "locks" the layers in place.
Phase 3: Finishing and Frosting
- Beat the cold heavy cream, powdered sugar, and vanilla on high. Mix until stiff peaks form and the cream doesn't slump.
- Spread the whipped topping over the frozen ice cream. Note: Work quickly so the ice cream doesn't soften.
- Freeze for another 2 hours. Wait until the cake feels firm to the touch before removing the pan ring.
Pro Tips and Pitfalls
One thing I learned the hard way: don't let your ice cream sit on the counter too long. You want it "spreadable," not "soupy." If it's too hard, let it sit for exactly 5 minutes. If it's too soft, the layers will bleed into each other, and you'll lose that beautiful striped look.
Another quirk is the whipped cream. If you overbeat it, you'll get butter. Stop the mixer the second the peaks stand up straight. I usually under beat it slightly and then finish the last few strokes with a whisk to get that silky finish.
Chef's Note: If you're struggling to get the ice cream smooth, dip your spatula in hot water and wipe it dry between scoops. The heat helps the tool glide over the frozen surface.
Flavor Twists and Swaps

You can easily turn this into a Mini Ice Cream Cake Recipe by using 4 inch ramekins instead of a big pan. Just halve the layers and reduce the final freeze time by 30 minutes. If you want something a bit more sophisticated, try a lemon cake base with raspberry ice cream and fresh berries in the middle.
For those who want a different approach, check out my Cake with Cake Mix recipe for a slightly different base texture. You can also swap the chocolate chips for toasted nuts or a swirl of salted caramel.
| Original Ingredient | Substitute | Why It Works |
|---|---|---|
| Heavy Cream | Full fat Coconut Milk | Similar fat content. Note: Adds a tropical coconut flavor |
| Powdered Sugar | Maple Syrup | Adds a woody sweetness. Note: May make cream softer |
| Cake Mix | Brownie Mix | Denser and richer. Note: Heavier base requires more support |
Right then, if you're making this for a crowd, think about the "No Bake Ice Cream Cake" variations. You can use a layer of peanut butter cups between the vanilla and chocolate ice cream for a Reese's style treat.
Handling Common Issues
Troubleshooting Common Issues
| Issue | Solution |
|---|---|
| Why Your Cake Layers Bleed | If your layers are mixing, the ice cream was likely too warm when you added the second flavor. The boundary between the two becomes a slurry instead of a clean line. |
| Why the Topping Melts | This usually happens if the ice cream layer wasn't frozen long enough before you added the cream. The residual warmth from the "spreadable" ice cream melts the bottom of the whipped topping. |
| How to Get Clean Slices | Warm your knife! Run a long serrated knife under hot water for 30 seconds, wipe it dry, and then slice. The heat cuts through the frozen fat without cracking the cake base. |
Adjusting the Size
If you're only feeding two people, go for the Mini Ice Cream Cake Recipe mentioned earlier. Use a small bowl or glass jars for a "parfait" style version. You'll need about 1/4 of the cake mix and a single scoop of each ice cream.
For a massive party, you can double the recipe, but don't just use a bigger pan. I recommend making two separate 9 inch cakes. If you try to make one giant cake, the center takes forever to freeze, and you might end up with a soft middle and frozen edges.
When doubling, remember that you don't need to double the vanilla extract in the cream. 1.5 teaspoons is usually plenty for 4 cups of cream. Working in batches prevents your mixer from overflowing and keeps the cream cold.
Busted Dessert Myths
Some people think you need a professional ice cream maker to make a Homemade Ice Cream Cake. That's not true. Using high-quality store-bought pints actually provides a more consistent freeze for layered cakes than homemade churned ice cream, which can sometimes have larger ice crystals.
Another myth is that you can't use a "no bake" base. You absolutely can. A crushed cookie and butter base works great, though it changes the profile from a cake to more of a frozen cheesecake.
Storage and Leftovers
Keep this cake in the freezer. If you put it in the fridge, it will turn into a puddle within an hour. Store it in an airtight container or wrap the springform pan tightly in plastic wrap to prevent freezer burn. It stays fresh for about 2 weeks.
For zero waste, if you have leftover cake mix crumbs or a bit of whipped cream, don't toss them. Mix the crumbs into a small batch of frosting for cupcakes or fold the leftover whipped cream into some fresh berries for a quick breakfast treat.
If you're reheating the cake base (for some reason), avoid the microwave. It will make the cake rubbery. Just let it thaw naturally for 10 minutes on the counter.
Final Presentation Tips
To make this look like a professional bakery item, add a border of whipped cream peaks around the top edge. You can use a piping bag or just a plastic bag with the corner snipped off. Top the center with fresh strawberries or a drizzle of melted chocolate.
If you're serving this alongside other drinks, a glass of Homemade Eggnog is a great pairing during the winter months. The creamy, spiced notes of the drink complement the chocolate layers.
Finally, remember to remove the springform ring slowly. If it feels stuck, run a thin knife around the edge of the cake first. This prevents the sides from tearing and keeps your Layered Ice Cream Cake Recipe looking sharp.
Recipe FAQs
How to make an ice cream cake quickly?
Press a cold cake layer into a lined springform pan and layer two flavors of ice cream. Freeze for two hours, add whipped topping, and freeze again for another two hours. If you enjoyed the speed of this no-cook assembly, apply the same rapid-prep logic to our 10 minute guacamole.
Can I use box cake mix for ice cream cake?
Yes, it works perfectly as a sturdy base. Use white or yellow cake mix to keep the flavor neutral and the structure firm enough to support the ice cream.
How to get clean slices when cutting the cake?
Warm a long serrated knife under hot water for 30 seconds. Wipe the blade dry between each cut to ensure a smooth, professional edge without dragging the topping.
Why did my ice cream layers bleed together?
This happens when the first layer of ice cream is too warm. Ensure the vanilla layer is firm before adding the chocolate or strawberry layer to maintain a clean boundary.
How long should I freeze the cake before adding the topping?
Freeze for at least 2 hours. This ensures the ice cream is solid enough to support the whipped cream without causing the bottom of the topping to melt.
Can I use strawberry ice cream instead of chocolate?
Yes, strawberry is a great alternative. It pairs well with the vanilla layer and chocolate chips for a refreshing flavor profile.
Where should I store the cake to keep it from melting?
Keep it in the freezer inside an airtight container. Avoid the refrigerator entirely, as the cake will turn into a puddle within an hour.
Quick Ice Cream Cake Recipe for 12