Strawberry Brownie Kabobs: Fudgy and Fresh

- Time: 10 min active + 30 min cook + 60 min chilling/setting = Total 1 hours 40 mins
- Flavor/Texture Hook: Fudgy, velvety chocolate paired with a shatter crisp drizzle and juicy berries
- Perfect for: Birthday parties, baby showers, or a fun weekend activity with the kids
- The Secret to Stable Strawberry Brownie Kabobs
- Quick Details for Your Dessert Party
- The Logic Behind the Layers
- The Essential Elements for Sweet Skewers
- Minimal Tools for a Mess Free Kitchen
- Putting Together Your Strawberry Brownie Kabobs
- Fixing Common Assembly Hiccups
- Creative Twists on a Classic Treat
- Keeping Your Treats Fresh and Firm
- Perfect Pairings for a Dessert Spread
- Recipe FAQs
- 📝 Recipe Card
The Secret to Stable Strawberry Brownie Kabobs
The smell of melting semi sweet chocolate always reminds me of my youngest's eighth birthday party. I had this grand vision of these gorgeous, colorful skewers, but in my rush, I used brownies that were still slightly warm from the oven.
As I pushed the bamboo stick through, the brownie didn't just slide, it completely disintegrated into a heap of fudgy crumbs. I remember standing there, chocolate on my apron and a very confused eight year old watching me, wondering why my "easy" dessert had become a crumbly disaster.
That's when I learned the most important rule for any dessert on a stick: temperature is everything. Once I started chilling my brownies completely before slicing, the game changed. The brownies became firm and structural, allowing them to hold onto the strawberry and marshmallow without sliding off or splitting.
It's a small shift, but it's the difference between a professional looking treat and a sticky mess on a plate.
When you make these Strawberry Brownie Kabobs, you're looking for a specific contrast. You want that velvety, rich chocolate hit from the brownie, the airy bounce of a marshmallow, and the bright, tart snap of a fresh strawberry.
It's a classic trio for a reason, and when you put them on a skewer, it makes the whole experience feel like a fancy boutique treat without requiring any actual "chef" skills. Trust me, the assembly is the fun part, as long as you've got your brownies chilled.
Quick Details for Your Dessert Party
Right then, before we get into the thick of it, let's look at the logistics. This is a low stress recipe, but the timing can be tricky because of the resting periods. You aren't spending hours at the stove, but you do have to be patient with the cooling process.
If you're planning these for a party, I always suggest prepping the brownies the night before. It removes all the stress and ensures you have that firm texture we're after.
The balance of flavors here is designed to keep the sugar from being overwhelming. The strawberry is the hero here, providing a necessary acidic lift that cuts through the density of the brownie. It's a smart way to serve a rich dessert because the fruit makes it feel a bit lighter.
Plus, it's a great way to use up those strawberries that are perfectly ripe but maybe not "cake decorating" pretty.
DIVTABLE_0
Since these are finger foods, you don't need to worry about plates or forks, which makes them a dream for hosting. Just a platter and some parchment paper for the setting process, and you're golden. Let's crack on to the details of what actually makes this work.
The Logic Behind the Layers
I'm not a scientist, but after a few "crumbly disasters," I've noticed a few things about how these components behave together. It's all about managing moisture and stability.
- Cold Set Structure: Chilling the brownies firms up the fats, creating a denser matrix that resists splitting when the skewer passes through.
- Acidity Balance: The natural citric acid in the strawberries breaks through the heavy cocoa butter of the chocolate, preventing the dessert from feeling too "cloying."
- The Butter Bond: Adding a touch of butter to the chocolate chips doesn't just add flavor, it lowers the melting point and creates a smoother, more fluid drizzle that doesn't seize.
- Moisture Barrier: Placing the brownie between the strawberry and marshmallow prevents the fruit's juices from soaking directly into the marshmallow, which would otherwise make it gummy.
DIVTABLE_1
The Essential Elements for Sweet Skewers
For this recipe, quality matters, especially with the strawberries. You want berries that are firm to the touch. If they're too mushy, they'll slide right off the stick or leak juice into your chocolate drizzle. I usually look for the ones with the brightest red color all the way to the top.
Ingredients:
- 8 oz (225g) fudgy brownie Why this? A dense brownie holds its shape better than a cakey one
- 1 lb (450g) strawberries, hulled Why this? Provides the essential tart contrast to the sugar
- 6 large marshmallows (150g) Why this? Adds an airy texture and a "glue" for the berries
- 6 inch bamboo skewers Why this? Short enough to be handheld but sturdy enough for the weight
- 1/2 cup (90g) semi sweet chocolate chips Why this? Balanced sweetness that doesn't mask the fruit
- 1 tbsp (14g) unsalted butter Why this? Ensures the drizzle is velvety and smooth
| Original Ingredient | Substitute | Why It Works |
|---|---|---|
| Semi Sweet Chips | Dark Chocolate (70%) | More intense cocoa flavor. Note: Less sweet, better for adults |
| Fresh Strawberries | Fresh Raspberries | Similar tartness. Note: Much more fragile, use more carefully |
| Large Marshmallows | Cubed Pound Cake | Adds a buttery richness. Note: Heavier, might require shorter skewers |
| Unsalted Butter | Coconut Oil | Similar fat content. Note: Adds a slight tropical hint |
It's honestly not worth it to use low-fat alternatives here. The fat in the butter and the full fat brownies is what gives you that velvety mouthfeel. If you're looking for something a bit more decadent, you can always swap the semi sweet chips for a milk chocolate, but you'll lose some of that sophisticated edge.
Minimal Tools for a Mess Free Kitchen

You don't need a fancy kitchen to pull this off. In fact, the fewer tools you use, the easier the cleanup is. I've found that using a microwave for the chocolate is far more reliable for a home cook than a double boiler, which often feels like overkill for half a cup of chips.
The Basic Kit:
- Sharp Chef's Knife: For those clean, uniform 1 inch cubes. A dull knife will squish the brownie rather than cut it.
- Cutting Board: A large plastic or wood board to organize your "assembly line."
- Microwave Safe Bowl: Glass or ceramic is best for the chocolate drizzle.
- Parchment Paper: Essential for the baking sheet so the chocolate doesn't stick to the pan.
- Baking Sheet: To hold the kabobs while they set.
Chef's Tip: If you're struggling to get the skewers through the brownies, try warming the tip of the skewer slightly with a lighter or a warm cloth. It helps it glide through the fudgy center without cracking the edges.
Putting Together Your Strawberry Brownie Kabobs
Let's get into the assembly. The key here is the "assembly line" method. Don't make one kabob at a time; instead, prep all your cubes, then all your berries, then all your marshmallows. It makes the process much faster and more consistent.
- Prepare the brownies. Trim the edges of the chilled brownies to create a perfect rectangle and slice them into uniform 1 inch (2.5cm) cubes. Note: Trimming the edges ensures every cube is the same density.
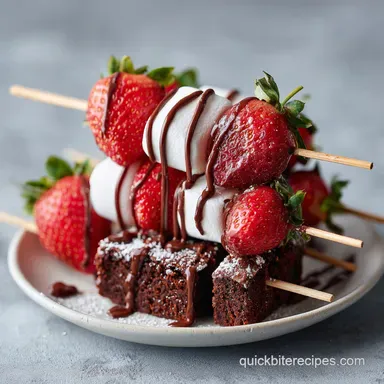
- Start the threading. Thread the components onto the bamboo skewers in the following order: one whole strawberry (pointed end down), one brownie cube, one large marshmallow, and one strawberry half or whole berry on top.
- Arrange the skewers. Place assembled kabobs on a parchment lined baking sheet. Note: Leave about an inch of space between them so the chocolate doesn't bridge the gap.
- Melt the chocolate. Microwave chocolate chips and butter in 20 second intervals, stirring after each burst, until liquid and glossy.
- Apply the drizzle. Drizzle the chocolate in a zig zag motion across the skewers.
- Set the chocolate. Let the kabobs sit for 5 minutes until the chocolate is firm to the touch.
- Cube Size
- Exactly 1 inch (2.5cm) to ensure the skewer stays balanced.
- Microwave Timing
- Strictly 20 second bursts to avoid scorching the chocolate.
- Setting Time
- Minimum 5 minutes of undisturbed resting before moving them to a platter.
Fixing Common Assembly Hiccups
Even with the best plan, things can go sideways in the kitchen. Most of the time, it's a matter of temperature or moisture. I've spent enough time fighting with sliding strawberries to know exactly what's happening.
The Brownie is Splitting
If your brownie cubes are cracking as you push the skewer through, it usually means they weren't chilled long enough or they are too "cakey" rather than "fudgy." A cakey brownie has more air and less fat, making it more prone to crumbling.
Strawberries are Leaking
When berries release too much juice, the chocolate drizzle will bead up and slide off instead of clinging to the fruit. This happens if the berries were washed and not dried, or if they've been sitting out too long after being hulled.
The Chocolate is Lumpy
If your chocolate drizzle looks grainy or has clumps, you've likely overheated it. Chocolate is sensitive; once it "seizes" or burns, you can't really fix it. Start over and stick to those 20 second bursts.
| Problem | Root Cause | Solution |
|---|---|---|
| Sliding Berries | Surface moisture | Pat berries dry with a paper towel |
| Brownie Crumble | Not chilled enough | Refrigerate for at least 1 hour |
| Dull Drizzle | Not enough butter | Stir in an extra 1/2 tsp of melted butter |
Common Mistakes Checklist:
- ✓ Pat strawberries completely dry before threading.
- ✓ Use a very sharp knife for the brownie cubes to avoid crushing them.
- ✓ Do not over microwave the chocolate - stop as soon as the last lump disappears.
- ✓ Ensure brownies are fully chilled (ideally 4°C / 40°F) before slicing.
- ✓ Thread the strawberry pointed end first for maximum stability.
Creative Twists on a Classic Treat
Once you've mastered the basic version, you can really start to play with the flavors. This is where it gets fun. I love experimenting with different "themes" depending on the season. For a more wintery vibe, you could use a peppermint infused chocolate for the drizzle.
If you're looking for other ways to use brownies in your dessert spread, you might love my Peanut Butter Brownie Swirl Cookie recipe, which brings that same fudgy richness but in a portable cookie format.
Flavor Variations:
- The Tropical Twist: Swap the strawberries for chunks of fresh mango and the marshmallows for pieces of toasted coconut.
- The White Chocolate Dream: Use white chocolate chips and a hint of vanilla extract in the drizzle for a creamier, sweeter finish.
- The PB&J Style: Use peanut butter brownies and add a small dot of raspberry jam on top of each brownie cube before threading.
Dietary Adaptations:
- gluten-free: Use your favorite GF brownie mix. The structure is usually very similar to traditional brownies, so the assembly remains the same.
- dairy-free: Use vegan chocolate chips and swap the butter for a high-quality vegan butter or refined coconut oil.
Keeping Your Treats Fresh and Firm
These aren't the kind of desserts you can make three days in advance and leave on the counter. Because of the fresh fruit, they have a limited shelf life. The strawberries will eventually release moisture, which will soften the brownie and make the marshmallow gummy.
Storage Guidelines:
- Fridge: Store in an airtight container lined with parchment paper for up to 24 hours. I recommend keeping them in a single layer so the chocolate doesn't smudge.
- Freezer: You can freeze these for up to 1 month, but the strawberries will lose their fresh "snap" upon thawing. They're better eaten as a frozen treat!
- Reheating: Honestly, don't reheat these. The chocolate will melt and the marshmallows will collapse. Enjoy them chilled or at room temperature.
Zero Waste Tips: Don't toss those brownie scraps from the edges! I usually toss them in a bowl with some melted chocolate and nuts to make "brownie truffles" for the kids.
As for the strawberry hulls, if you have a lot of them, you can freeze them and toss them into a homemade fruit syrup or a compost bin to keep them out of the landfill.
Perfect Pairings for a Dessert Spread
These kabobs are a star on their own, but they really shine when paired with other complementary textures. Since they are quite rich and sweet, I like to surround them with things that provide a bit of a palate cleanser.
A platter of fresh mint leaves or a side of whipped cream for dipping can add a nice touch. If you're serving these at a party, try pairing them with a light, sparkling drink like a prosecco or a lemon infused sparkling water. The bubbles help cut through the richness of the chocolate.
For a more substantial dessert table, I suggest adding some salty elements, like pretzels or salted almonds. The salt sweet contrast makes people want to go back for a second or third kabob.
Just remember to keep the skewers organized on a platter with a small dip of raspberry coulis or salted caramel for those who want an extra bit of indulgence.
Recipe FAQs
Why do the brownies need to be chilled?
Chilling creates structural stability. Firm brownies hold their shape when pierced by the bamboo skewer, preventing them from splitting or turning into crumbs.
How to assemble the kabobs?
Thread components in this order: strawberry, brownie cube, marshmallow, then strawberry. Place the first strawberry pointed end down to keep the treat stable on the plate.
How to melt the chocolate for the drizzle?
Microwave chocolate chips and butter in 20-second intervals. Stir between each interval until the mixture is liquid and glossy.
Can I use frozen strawberries instead of fresh?
No, stick with fresh. Frozen berries release too much moisture and will bleed color into the brownie and marshmallow.
Is it true that warm brownies are easier to thread onto skewers?
No, this is a common misconception. Warm brownies are too soft and typically disintegrate or crumble during assembly.
How to prevent the chocolate from scorching in the microwave?
Use short 20-second bursts. Frequent stirring ensures even heat distribution and prevents the chocolate from overheating.
How long should the kabobs sit before serving?
Let them sit for 5 minutes. This gives the chocolate drizzle enough time to set completely so it doesn't smudge.
Strawberry Brownie Kabobs