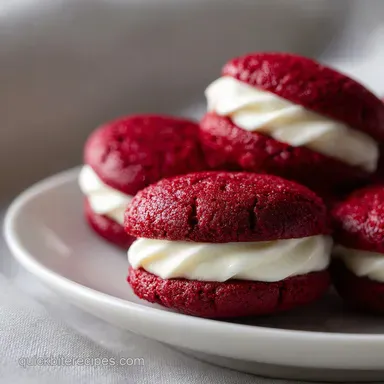
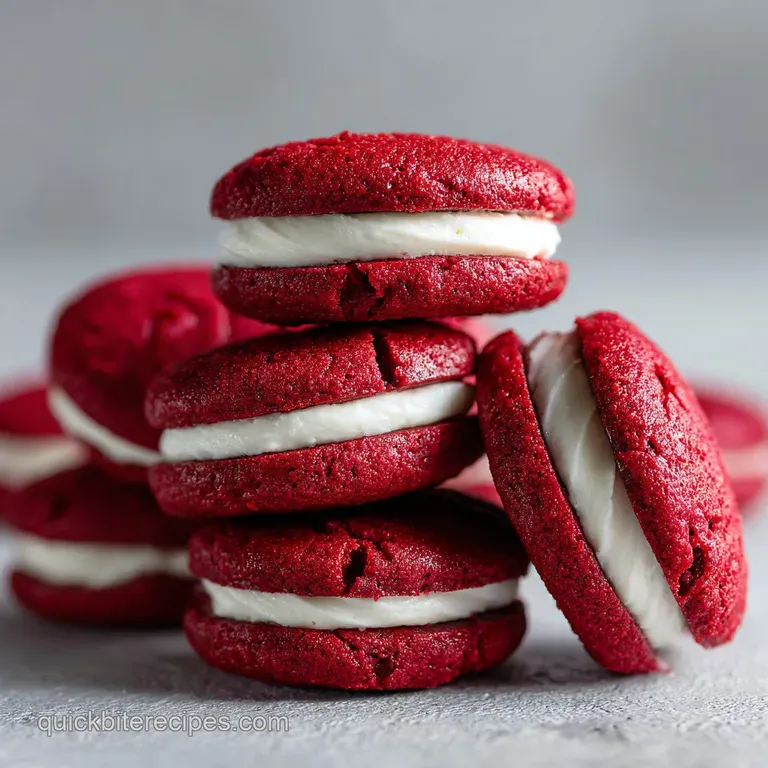
Red Velvet Cream Cheese Thumbprint Cookies: Velvety
- Time:20 minutes active + 30 minutes chilling = Total 1 hour 2 minutes
- Flavor/Texture Hook: Velvety cocoa base with a tangy, stiff cream cheese center
- Perfect for: Holiday cookie platters or a cozy weekend bake
- Why This Bake Actually Works
- Sizing Your Batch
- Component Analysis
- Essential Pantry Ingredients
- Simple Tools for Easy Baking
- Step by Step Baking Process
- Fixing Your Cookie Mistakes
- Troubleshooting Common Issues
- Creative Flavor Twists
- Keeping Your Treats Fresh
- The Best Drink Pairings
- Recipe FAQs
- 📝 Recipe Card
Why This Bake Actually Works
I used to wonder why some red velvet cookies came out like flat pancakes and others stayed plump. It turns out, the secret isn't in the ingredients, but in how they handle the heat. If you've ever tried my Royal Purple Velvet Cake, you know that "velvet" is all about that tight, fine crumb.
The Cold Start: Chilling the dough for 30 minutes solidifies the butter. This means the cookies don't spread immediately when they hit the oven, leaving a deep well for the filling.
Acid Balance: The cocoa powder and the slight acidity in the red coloring react with the baking soda. This creates tiny air bubbles that make the dough tender rather than tough.
Fat Stabilization: Adding butter to the cream cheese filling keeps it from becoming too runny. It creates a structural support that holds its shape even after 12 minutes of baking.
Moisture Control: Using gel coloring instead of liquid prevents the dough from becoming too wet. Too much liquid makes the cookies cakey and ruins that classic chewy thumbprint texture.
Sizing Your Batch
Since these are usually for parties, you might need more than a standard batch. Here is how to adjust based on your crowd.
| Servings | Ingredient Adjustments | Pan Size | Cook Time |
|---|---|---|---|
| 12 cookies | Half all ingredients | 1 medium sheet | 10-11 minutes |
| 24 cookies | Use original schema | 2 large sheets | 10-12 minutes |
| 48 cookies | Double all ingredients | 4 large sheets | 11-13 minutes |
It is usually better to bake in batches rather than overcrowding your oven. If you put too many trays in at once, the air doesn't circulate, and you'll end up with uneven bottoms.
Component Analysis
Understanding what each part does helps you avoid those "why did this happen" moments. Here is the breakdown of the heavy hitters in this recipe.
| Ingredient | Science Role | Pro Secret |
|---|---|---|
| Unsalted Butter | Provides structure and richness | Must be softened, not melted, for air pockets |
| Cocoa Powder | Adds depth and reacts with soda | Sift it to avoid dark clumps in the red dough |
| Red Gel Color | Creates the signature hue | Gel is more concentrated than liquid drops |
| Cream Cheese | Provides the tangy contrast | Use full fat blocks, not the spreadable tub kind |
Essential Pantry Ingredients
Right then, let's get your counters ready. I've listed everything you need. Trust me on the butter - don't use the low-fat stuff here or the cookies will feel dry.
For the Red Velvet Dough:
- 1/2 cup (115g) unsalted butter, softenedWhy this? Provides the creamy base and structure
- 3/4 cup (90g) granulated sugarWhy this? Gives a crisp edge and sweet balance
- 1 large egg (50g)Why this? Binds the dough and adds moisture
- 1 tsp (5ml) vanilla extractWhy this? Rounds out the cocoa bitterness
- 1 tbsp (15ml) red food coloring gelWhy this? Vibrant color without thinning the batter
- 1 1/2 cups (190g) all purpose flourWhy this? Standard protein for a chewy bite
- 2 tbsp (15g) unsweetened cocoa powderWhy this? Essential for that red velvet flavor
- 1/2 tsp (3g) baking sodaWhy this? Helps the cookies rise and brown
- 1/4 tsp (1.5g) saltWhy this? Enhances the chocolate notes
For the Cream Cheese Filling:
- 4 oz (115g) cream cheese, softenedWhy this? The star tangy element
- 2 tbsp (30g) unsalted butter, softenedWhy this? Prevents the filling from melting
- 1 cup (120g) powdered sugarWhy this? Creates a smooth, pipeable consistency
- 1/2 tsp (2.5ml) vanilla extractWhy this? Adds a floral sweetness
Ingredient Swaps
Sometimes the pantry is bare. Here is what you can use instead without ruining the batch.
| Original Ingredient | Substitute | Why It Works |
|---|---|---|
| Red Gel Color | Beet Powder (2 tbsp) | Natural option. Note: Color will be more earthy/muted |
| All Purpose Flour | 1:1 gluten-free Blend | Similar structure. Note: May be slightly more fragile |
| Granulated Sugar | Coconut Sugar | Similar sweetness. Note: Dough will be darker/brownish |
| Butter (Filling) | Mascarpone | Higher fat content. Note: Richer, slightly milder taste |
I've found that using a bit of espresso powder in the dough can really make the cocoa pop, though it's not in the official list. It just deepens the flavor.
Simple Tools for Easy Baking
You don't need a fancy arsenal here. I usually just use a hand mixer and a couple of bowls. If you have a piping bag, great, but a small spoon works just as well for the filling.
- Hand mixer or whisk: For creaming the butter and sugar.
- Two mixing bowls: One for wet, one for dry.
- Baking sheets: Lined with parchment paper or silicone mats.
- 1 tablespoon scoop: To keep the cookie sizes consistent.
- Rounded teaspoon: For pressing the thumbprint wells.
- Small piping bag: Optional, for a neater filling look.
Step by step Baking Process

Let's crack on. Remember to keep an eye on those sensory cues - the smell and the look are your best guides.
Phase 1: Crafting the Vibrant Dough
- Cream the butter and sugar. Beat the softened butter and granulated sugar together until the mixture looks pale and fluffy. Note: This incorporates air, which keeps the cookies from being too dense.
- Add the wet ingredients. Beat in the egg, vanilla, and red gel coloring until the color is uniform and there are no streaks.
- Whisk the dry elements. In a separate bowl, whisk the flour, cocoa powder, baking soda, and salt. Note: Sifting the cocoa here prevents those annoying brown lumps.
- Combine and blend. Gradually blend the dry ingredients into the wet. Mix just until a soft, mahogany colored dough forms. Note: Stop mixing the second the flour disappears to avoid tough cookies.
- Chill the dough. Wrap the dough in plastic and refrigerate for 30 minutes. This is non negotiable if you want them to keep their height.
Phase 2: Shaping the Thumbprints
- Heat the oven. Preheat your oven to 350°F (175°C).
- Roll the dough. Scoop about 1 tablespoon of chilled dough and roll it into a 1 inch ball. Place these on a lined baking sheet with a bit of space between them.
- Create the well. Use your thumb or the back of a rounded teaspoon to press a deep well into the center of each ball. Note: Make the well deeper than you think you need, as the dough will rise slightly.
Phase 3: Filling and Baking
- Whip the filling. Beat the cream cheese, butter, powdered sugar, and vanilla until the mixture is smooth and stiff.
- Fill the centers. Pipe or spoon about 1 teaspoon of the cream cheese mixture into each cookie center.
- Bake the batch. Bake for 10-12 minutes until the edges are set and the centers are no longer shiny.
Fixing Your Cookie Mistakes
Even for us, things go sideways sometimes. Usually, it's just a temperature issue.
Troubleshooting Common Issues
| Issue | Solution | ||||||||||
|---|---|---|---|---|---|---|---|---|---|---|---|
| Why Your Cookies Spread Too Much | If your cookies look like flat red discs, the butter was likely too warm. When butter melts too quickly in the oven, the structure collapses before the flour can set. | ||||||||||
| Why the Filling is Leaking or Melting | This happens if the cream cheese was too soft or if you overbaked the cookies. The filling should be stiff; if it's too runny, it will bubble over the sides. | ||||||||||
| Why the Red Color Faded to Brown | Too much baking soda or an oven that's too hot can cause the red pigment to break down. Stick to the 350°F (175°C) limit. | Problem | Root Cause | Solution | :--- | :--- | :--- | Flat cookies | Bu |
Creative Flavor Twists
This Velvet Cream Cheese Thumbprint Cookie with a Festive Twist on a Classic is great as is, but you can definitely play with the flavors. I love experimenting with the filling to change the mood of the cookie.
If you're in the mood for something a bit more citrusy, you can try a Cream Cheese Lemon Cookie recipe style filling. Just add a zest of lemon and a drop of lemon extract to the cream cheese mixture. It cuts through the richness of the cocoa beautifully.
- - Nutty Edge
- Roll the dough balls in finely crushed pecans before pressing the thumbprint.
- - Zesty Finish
- Grate a tiny bit of orange zest over the cream cheese filling immediately after baking.
- - Chocolatey Core
- Place a single mini chocolate chip at the bottom of the thumbprint well before adding the cream cheese.
If you want a different texture altogether, you could try substituting the red velvet base for a shortbread, but you'll lose that signature, velvety crumb that makes this recipe special.
Keeping Your Treats Fresh
Because these have a dairy based filling, you can't just leave them in a jar on the counter for a week. The cream cheese is the boss here.
Storage Guidelines:
- Fridge: Store in an airtight container for up to 5 days. I recommend placing a piece of parchment paper between layers so they don't stick.
- Freezer: You can freeze the baked cookies for up to 2 months. Wrap them individually in foil then put them in a freezer bag.
- Reheating: Let them thaw in the fridge overnight, or give them a very quick 5 second zap in the microwave to soften the butter.
Zero Waste Tips: Don't throw away the leftover cream cheese filling! If you have a bit left in the piping bag, swirl it into a bowl of fresh berries for a quick breakfast. If you have a bit of red velvet dough left over, roll it into tiny balls and bake them as "mini bites" without the filling.
The Best Drink Pairings
The richness of the cream cheese and the depth of the cocoa mean these cookies need something to balance them out. You want something that cuts through the fat.
Cold Pairings: A glass of ice cold whole milk is the gold standard. The neutrality of the milk cleanses the palate between bites of the tangy filling. For something fancier, a cold brew coffee with a splash of cream works wonders.
Hot Pairings: A strong Earl Grey tea is a fantastic partner. The bergamot notes in the tea highlight the vanilla in the cookie. If you're feeling cozy, a small cup of peppermint tea provides a refreshing contrast to the heavy chocolate and cheese.
Right then, you've got everything you need. This Velvet Cream Cheese Thumbprint Cookie with a Festive Twist on a Classic is all about that blend of tang and sweetness. It's simple, it's vibrant, and it always looks more impressive than it actually is to make. Now, go get your apron on and let's get baking!
Recipe FAQs
How should I store these cookies?
Store in an airtight container in the refrigerator. Because of the cream cheese filling, they require cold storage to stay fresh. If you enjoy preparing chilled party snacks, try our homemade hummus.
Can I make these without red food coloring?
Yes, you can omit it. The cookies will simply be a deep mahogany brown color provided by the cocoa powder.
What's the best way to press the thumbprints?
Use your thumb or the back of a rounded teaspoon. Press a deep well into the center of each chilled dough ball to ensure the filling stays contained during baking.
Why did my cookies spread too much?
The butter was likely too warm. When the butter melts too quickly in the oven, the structure collapses before the flour can set.
Why is the filling leaking or melting?
The cream cheese was too soft or the cookies were overbaked. The filling must be whipped until stiff to prevent it from bubbling over the sides.
Is it true that red velvet cookies always fade to brown?
No, this is a common misconception. Color fading usually only happens if the oven is too hot or if too much baking soda is used in the dough.
Do I really need to refrigerate the dough?
Chill for 30 minutes to ensure the cookies maintain their height. Cold dough prevents the cookies from flattening out during the 10 12 minute bake time.
Red Velvet Thumbprint Cookies