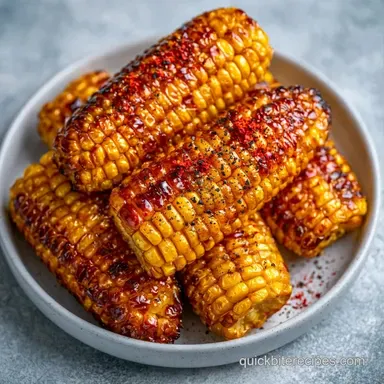
Quick Grilled Corn on the Cob with Lime

- Time: 15 min active + 12 min cook
- Flavor/Texture Hook: Smoky char with a bright lime finish
- Perfect for: Summer BBQs, weeknight sides, beginner grillers
That loud, aggressive pop and hiss when corn hits a hot grate is the sound of summer. I remember one family reunion where a cousin insisted on grilling corn in the husks for an hour. By the time they came off, they were pale, steamed, and tasted like wet cardboard.
It was a disaster that taught me a lesson: get the corn directly on the heat.
When you skip the husk, you get those mahogany char marks that actually taste like something. This method doesn't take all afternoon, and it doesn't require any fancy equipment. It's about high heat and fast movement.
You can expect a side that's sweet, salty, and has a little kick from smoked paprika. Whether you're hosting a crowd or just want a Quick Grilled Corn on the Cob for a Tuesday night, this approach hits the spot every time.
Quick Grilled Corn on the Cob Basics
The goal here is a balance between a scorched exterior and a tender interior. Most people make the mistake of grilling too low and too long, which dries out the kernels. I prefer a screaming hot grill that browns the corn in minutes.
It's a simple process, but the order of operations matters. If you put the butter on too early, it burns and tastes bitter. If you put it on too late, it doesn't soak in. The timing has to be just right.
For those who want a different approach, some prefer an Easy Grilled Corn on the Cob in Foil method. That keeps the corn moister but skips the char. If you really love the tradition, BBQ Corn on the Cob in Husk works, but it takes way longer and requires more patience.
| Method | Time | Texture | Best For |
|---|---|---|---|
| Direct Grill | 12 mins | Charred/Juicy | Bold flavor, speed |
| In Foil | 20 mins | Steamed/Soft | Low mess, buttery |
| In Husk | 30 mins | Natural/Sweet | Traditional taste |
The Essential Ingredients
I keep the seasoning simple because the corn does the heavy lifting. The lime juice is a non negotiable addition. It cuts through the richness of the butter and makes the sweetness of the corn pop.
According to USDA’s FoodData Central entry, corn provides essential carbs and fiber, making it a sturdy side for any protein. I always use unsalted butter so I can control the salt level with the kosher salt.
Why These Ingredients Work
| Ingredient | What It Does | Best Swap |
|---|---|---|
| Unsalted Butter | Carries flavor, adds richness | Ghee (higher smoke point) |
| Lime Juice | Adds acidity to balance sugar | Lemon juice |
| Smoked Paprika | Gives a deep, woody aroma | Ancho chili powder |
| Kosher Salt | Enhances natural sweetness | Sea salt |
Gear You'll Need
You don't need a professional setup for this. A standard gas or charcoal grill works. The most important tool is a pastry brush. Trying to spoon butter onto hot corn is a recipe for burns and uneven coverage.
I also recommend a pair of long handled tongs. You'll be working with high heat, and you want as much distance between your hand and the flames as possible. If you're using a charcoal grill, make sure your coals are white hot before you start.
Chef's Note: If your grill grates are rusty or old, rub them with a paper towel dipped in vegetable oil right before the corn goes on. It stops the kernels from sticking and tearing.
Steps from Prep to Plate
Start by prepping your corn. Pull off the husks and all those annoying silk threads. I usually leave about an inch of the husk at the bottom to act as a handle, but you can shuck them completely.
1. The over High heat Setup
Preheat your grill to medium high heat (400°F / 200°C). The grates should be hot enough that a drop of water sizzles and vanishes in two seconds. Make sure the grates are clean.
2. The First Char
Place the shucked corn directly on the grates. Close the lid and grill for 3–5 minutes per side. Wait until you see mahogany colored char marks and the kernels turn a bright, opaque yellow.
3. The Butter Baste
During the final 2 minutes of grilling, use your pastry brush to coat each ear with the melted butter mixture. The butter will bubble and sizzle, soaking into the crevices.
4. The Final Rest
Remove the corn from the heat immediately. Let it rest for 2 minutes. This allows the internal steam to soften the core and sets the butter.
What Makes This Work

High heat evaporates surface moisture quickly, allowing the sugars to brown and char without turning the inside into mush. The butter acts as a vehicle for the paprika and salt, binding them to the kernels.
The lime juice is added to the butter mixture rather than squeezed on at the end. This ensures every single kernel gets a hit of acidity, which prevents the dish from feeling too heavy.
Fixing Common Corn Problems
If your corn comes off the grill looking pale, your heat was too low. You need that 400°F temperature to get the color. If the kernels are popping or splitting, you've likely left them on too long or the heat was too aggressive.
Why Your Corn Stays Pale
This usually happens when the grill lid is left open, letting the heat escape. Keep the lid closed to create an oven like effect that cooks the core while the bottom chars.
Why Kernels Stick
Sticking happens when the corn is put on a cold grill or the grates aren't oiled. Don't try to force a stuck ear off; let it sit for 30 seconds, and it usually releases itself.
| Problem | Root Cause | Solution |
|---|---|---|
| Pale Kernels | Low temperature | Increase heat to 400°F |
| Burnt Butter | Basting too early | Baste in the last 2 mins |
| Dry Texture | Overcooked | Reduce cook time by 1 min |
Keeping and Reheating Corn
Corn is best eaten the second it leaves the grill, but leftovers happen. I store them in an airtight container in the fridge for up to 3 days.
Fridge Storage
Wrap individual ears in foil to keep them from drying out. This prevents the fridge odors from seeping into the butter and paprika.
Freezer Storage
You can freeze grilled corn for up to 2 months. Let them cool completely first, then vacuum seal or use a freezer bag with all the air squeezed out.
The Best Reheat Method
Avoid the microwave, as it makes the corn rubbery. Put the ears back on a over medium heat grill or in a 350°F oven for 5–8 minutes. A quick brush of fresh butter brings back that "just grilled" feel.
Customizing Your Flavor
I love the smoked paprika version, but you can change the vibe easily. For a creamy twist, swipe some mayo on the corn before adding a sprinkle of cotija cheese and chili powder.
If you're looking for a different cooking style, try an Easy Grilled Corn on the Cob in Foil. You'll need some regular stuff to wrap the corn and butter before grilling. This method is slower but results in a more tender, steamed texture.
For those who want a heartier side, this pairs well with a Classic Potato Salad. The creaminess of the potato salad balances the smoky char of the corn.
Diet Swaps
| Original Ingredient | Substitute | Why It Works |
|---|---|---|
| Unsalted Butter | Olive Oil | Heart healthy. Note: Lacks the creamy richness |
| Smoked Paprika | Cumin | Earthy flavor. Note: Less color than paprika |
| Lime Juice | Apple Cider Vinegar | Tangy. Note: More pungent than lime |
Best Side Dish Pairs
This corn is a powerhouse on the plate, but it needs company. I usually serve it alongside grilled proteins like steak or shrimp. The char on the corn mirrors the sear on the meat.
For a fresh contrast, I always make a 10 Minute Homemade Guacamole. The coolness of the avocado and the zing of the lime in the guac play perfectly with the smoky, hot corn.
If you're doing a full BBQ spread, keep the other sides light. Since the corn is rich and buttery, a simple vinegar based coleslaw or a crisp garden salad prevents the meal from feeling too heavy.
Recipe FAQs
What is the fastest way to grill corn?
Shuck the corn and grill directly on the grates. This method avoids the steaming time required for husks and ensures a quick cook.
Is it true that corn must be boiled before grilling?
No, this is a common misconception. Grilling fresh corn directly over high heat provides a superior charred flavor and faster results.
Is it better to grill corn in the husk or foil?
Grilling shucked corn is better for flavor and speed. Using husks or foil steams the corn, which takes longer and prevents the desired mahogany char marks.
How to prevent corn from sticking to the grill?
Lightly oil the grates before adding the corn. This prevents the kernels from bonding to the metal and makes flipping easier.
When should I apply the butter mixture?
Coat the corn during the final 2 minutes of grilling. Applying it too early can cause the butter to burn and smoke.
Why should I let the corn rest after grilling?
Resting for 2 minutes allows internal steam to soften the core. This ensures the heat distributes evenly for a tender bite.
How to serve grilled corn for a brunch spread?
Pair it with savory proteins. For a brunch-style cookout, this corn complements breakfast burritos perfectly.
Quick Grilled Corn on the Cob for 8 Ears